Tutorial · First-time setup

Shadowrocket Tutorial: Five Steps to Your First Connection

This page covers only the order of operations for Shadowrocket on iPhone and iPad: starting with adding a server and importing a subscription, then choosing a Global Routing mode, turning on the connection switch, verifying that the connection works, and finally troubleshooting connection failures in order. Every step uses the app's own interface wording, so you can simply follow along; each step can also be opened on its own from the jump bar below.

Before you start, confirm two things: first, Shadowrocket is already installed from the App Store (a paid app, one-time purchase, sold only on the App Store); second, you already have your own subscription link or server details (address, port, password, encryption method). This site does not provide, sell, or recommend any servers, subscriptions, or line plans — a one-time app purchase is not a line plan: buying the app does not mean you have a working server.

01 Add Server / Subscribe

Add a server or import a subscription

When you open Shadowrocket it lands on the Home page. The lower half of the page is the SERVER group, listing every server you have added; on a fresh install it is empty, and there are two ways to fill it: add one server by hand, or import several at once with a subscription link.

Adding a server by hand: tap Add Server in the SERVER group (or the + in the top-right corner) to open the Add Server page, then fill in the fields with the details you already have. Type selects the protocol — common ones are Shadowsocks, VMess, VLESS, Trojan, Hysteria2, and WireGuard; Host takes the server address, Port the port number, and Password and Method the values from your provider, while the remaining fields can stay at their defaults. When everything looks right, tap Done in the top-right corner to save, and the entry appears back in the SERVER list on the Home page. Once added, entries in the list can be edited or deleted at any time — just make sure the details come from your own provider before you change anything.

Importing a subscription: on the Home page choose Subscribe (the entry is also under the + in the top-right corner) and paste the subscription link from your provider into the address field, in the form https://example.com/sub?token=xxxx. After you save it, the app fetches the configuration and builds the server list automatically. The advantage of a subscription is that when your provider updates its servers, one refresh in the app keeps you in sync — no editing each server by hand. Providers sometimes hand out a QR code or a configuration file instead; those map to Scan QR Code and Import from Cloud JSON at the bottom of the Add Server page, so pick whichever matches what you received.

Two things that often go wrong: first, Type must match the details you have — pick the wrong protocol or encryption method and the connection will always fail; second, subscription links and passwords are access credentials, so don't post them publicly and keep them safe when you switch devices.

Once an entry shows up in the list, don't connect yet — first confirm the Global Routing mode, then turn on the switch.
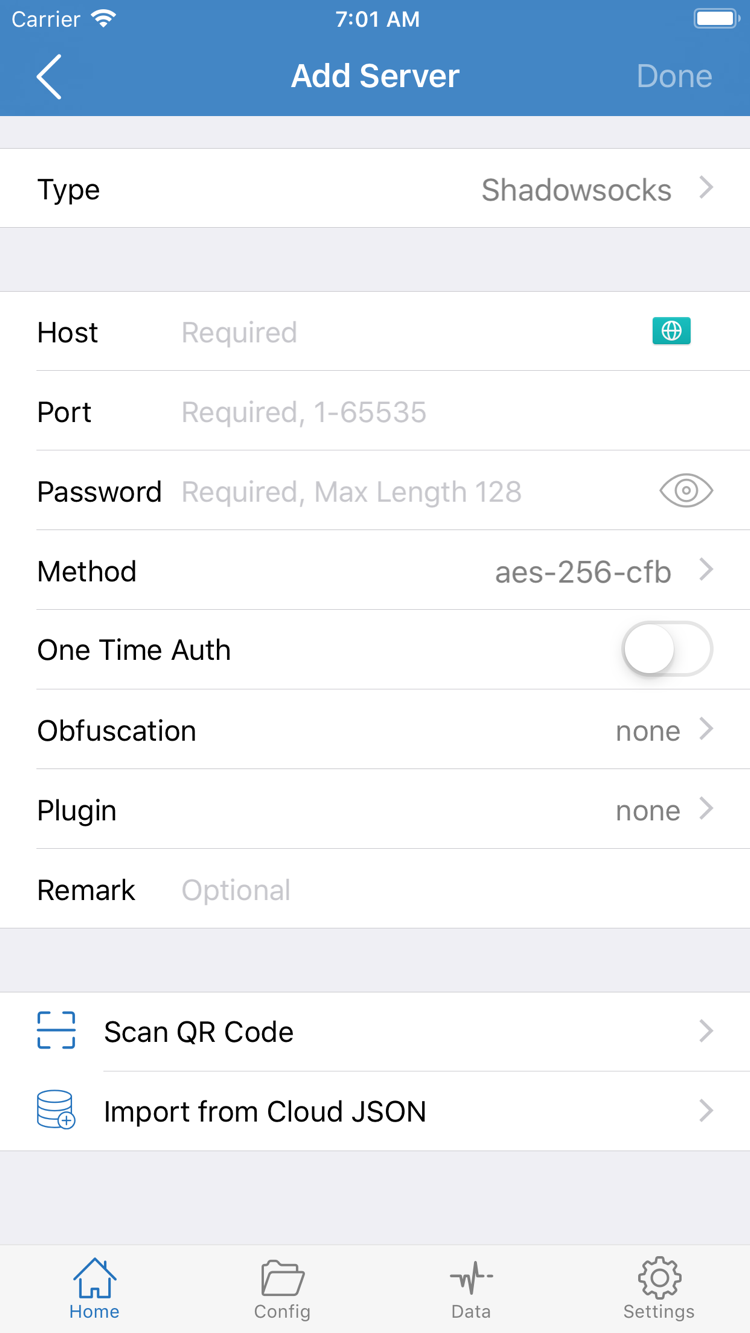
Shadowrocket Add Server screen: Type, Host, Port, Password, and Method fields, with Scan QR Code and Import from Cloud JSON at the bottom
Add Server: enter the server details by hand, with Scan QR Code and Import from Cloud JSON at the bottom.
02 Global Routing / Config

Choose a Global Routing mode

Back on the Home page, there is a Global Routing row below the switch showing the current mode on the right, which defaults to Config. Tap the row to open the selection page. The three modes are: Config, which evaluates the rules in your Config file one by one and sends matching traffic to PROXY, DIRECT, or REJECT; Proxy, which sends all traffic through the currently selected server; and Direct, which sends nothing through the server, effectively taking the app out of the path for the moment.

None of the three modes is better than the others — they differ only in the order in which decisions are made. Keeping Config for everyday use is the least work: domains that don't need a proxy go DIRECT without a detour, domains that do need one follow the rules to PROXY, and domains you specify are blocked outright with REJECT. Switch to Proxy or Direct only when you want to route everything through the proxy temporarily, or when you want to rule out the rules themselves in a comparison test.

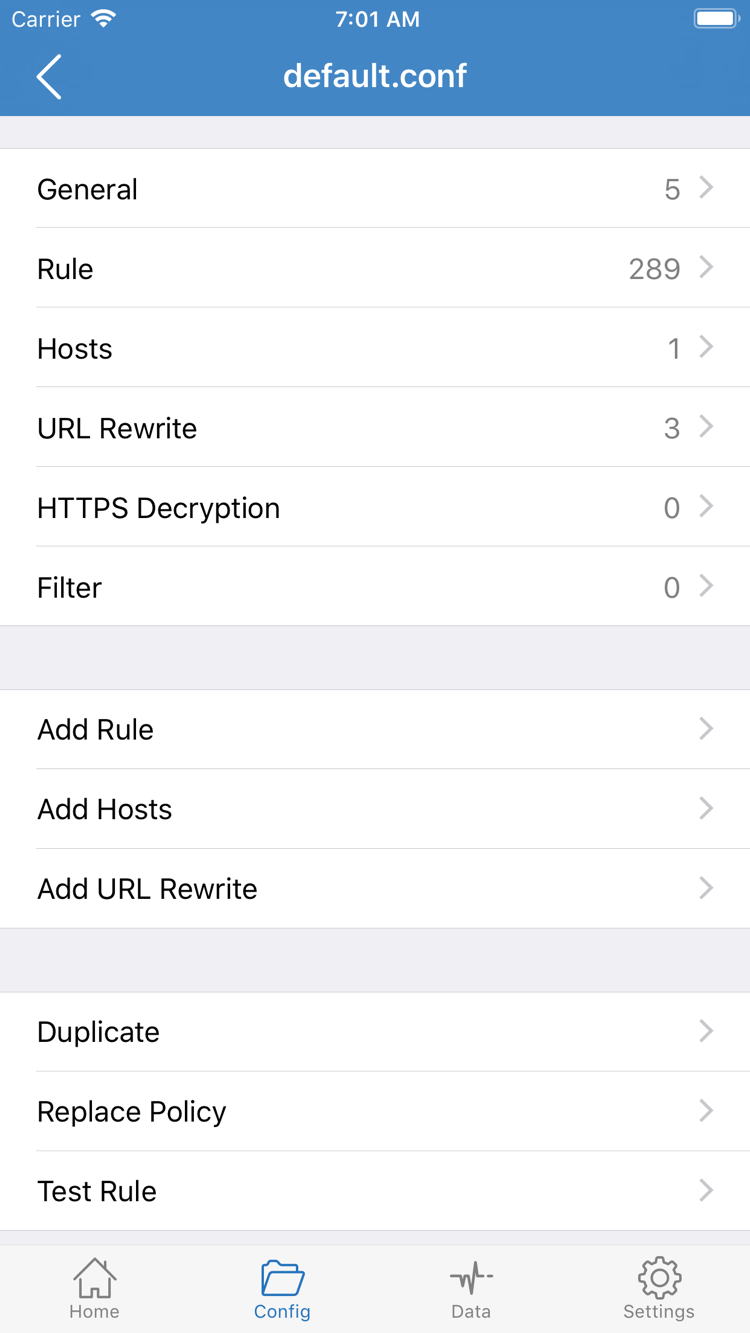
The rules themselves live in Config. Open Config and you'll see a configuration file split into General, Rule, Hosts, URL Rewrite, and HTTPS Decryption sections; the Rule section is where routing rules live. Tap Add Rule to add one, writing the keywords in English — for example, DOMAIN-SUFFIX,example.com,PROXY sends traffic for example.com and its subdomains through the proxy. Rules are matched from top to bottom, and the ones higher up win.

Rule keywords and syntax have plenty of detail, and this page only covers as much as you need; for how a particular rule should be written, or why a domain went direct, look under the Routing & troubleshooting category on the FAQ page. Once the mode is confirmed, go back to the Home page and turn on the switch.

Shadowrocket Config screen: General, Rule, Hosts, URL Rewrite, and HTTPS Decryption sections with Add Rule
Config: General, Rule, Hosts, URL Rewrite, and HTTPS Decryption sections; routing rules live in Rule.
03 Home / Not Connected

Turn on the connection switch

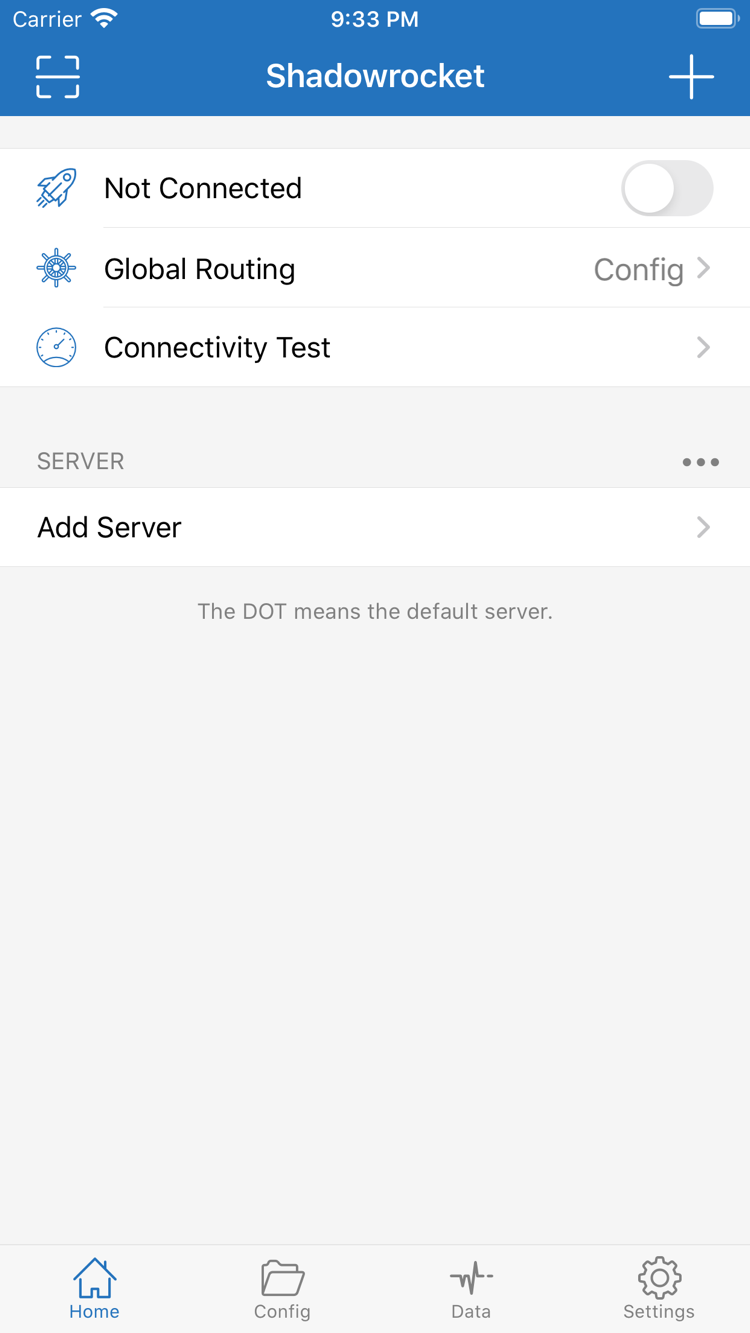
Back on the Home page, the switch at the very top shows Not Connected by default. Tap it and the app starts connecting to the currently selected server; your current network has to be working for this, otherwise the connection stalls during setup.

On the first connection, iOS shows a system prompt asking whether to allow a VPN configuration. That dialog comes from the system, not from any setting inside the app; once you confirm it (with your passcode, or Face ID / Touch ID), the app has permission to establish a tunnel. If you accidentally tapped Don't Allow before, go to Settings → General → VPN & Device Management and allow the entry again.

After you allow it, the switch changes from Not Connected to Connected, and the status area at the top starts showing how long this connection has lasted along with upload and download counters. These two are the direct evidence of whether the connection is really up: if the switch says Connected but the numbers don't move for a long time, the connection usually isn't actually running, and you should look at the server details and your current network rather than repeatedly editing rules.

To disconnect, tap the switch again; the status returns to Not Connected and the VPN badge disappears from the system status bar. A VPN entry also appears in system settings, recording the app's tunnel configuration; for day-to-day connecting and disconnecting, the switch inside the app is enough — there's no need to toggle things in system settings.

Once the connection is up, the next step is to confirm it works as expected.

Shadowrocket Home screen: switch at the top, Global Routing, Connectivity Test, and the SERVER group with Add Server below
Home: the switch at the top, Global Routing and Connectivity Test, with the SERVER group below.
04 Connectivity Test

Verify that the connection works

Verification has three layers; work through them from inside the app out to the browser, and if all three look right you can use it with confidence.

The first layer is Connectivity Test inside the app. There is a Connectivity Test row on the Home page; tapping it runs the tests in sequence and reports the result. A normal result means the client-to-server leg is working. You can change how the test runs under Test Method on the Settings page — if one method keeps failing on your network, try another one first.

The second layer is a real browser test. Open Safari and visit a few sites you use every day to see whether they load; if they don't, don't rush to change the server configuration — work through the troubleshooting order in the next step.

The third layer is the traffic counters. Back on the Home page, check whether the upload and download numbers in the status area change as you browse; if they move, traffic really is going through the client.

One thing worth spelling out: passing these checks only means the link between the client and the server is fine — it does not mean every website goes through the proxy. Whether a given domain goes to PROXY or DIRECT is decided by the rules in your Config, and that is normal routing behavior, not a fault.

05 Settings / Diagnostics

Troubleshooting order when you can't connect

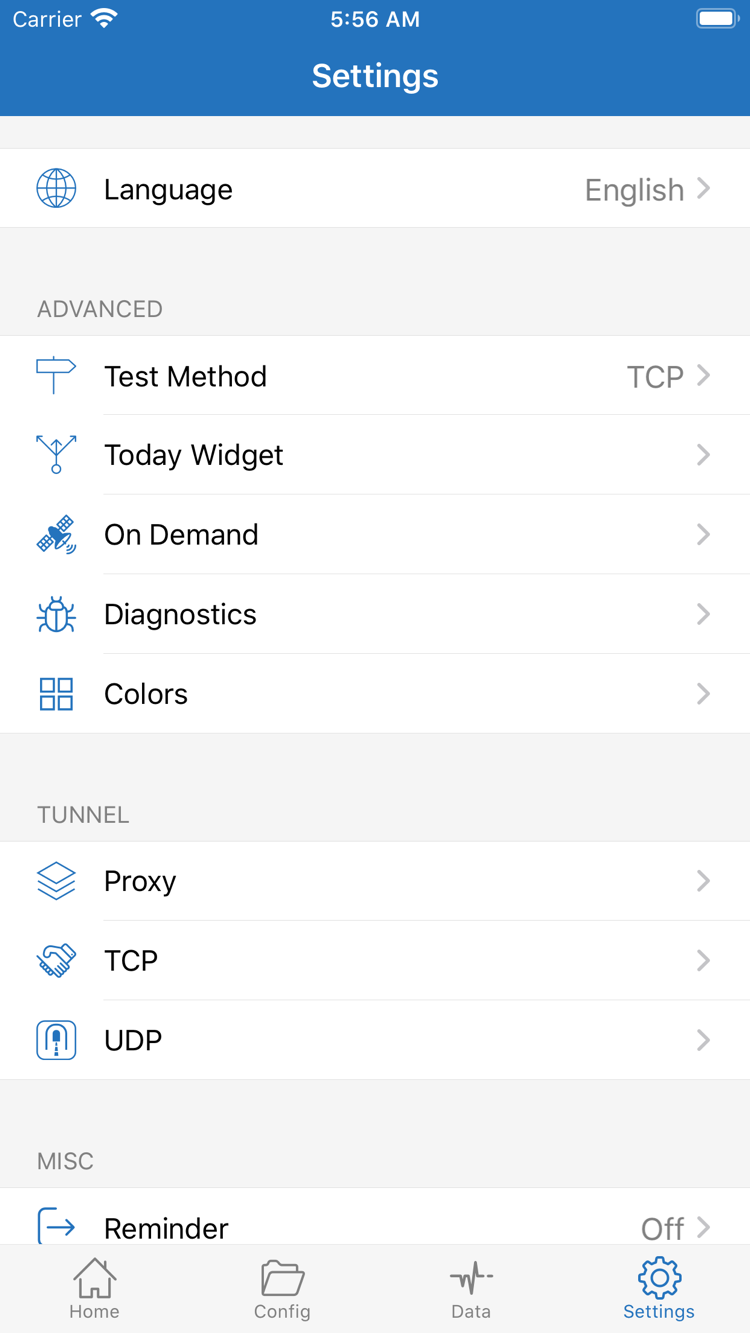
Connection failures usually come down to a few places; working through them from the outside in, as below, is faster than repeatedly changing your configuration. The options on the Settings page are useful here too: Test Method decides how Connectivity Test runs, On Demand controls on-demand connecting, Diagnostics shows diagnostic information, and the Proxy, TCP, and UDP items affect how traffic is forwarded.

The switch does nothing when tapped, or no VPN configuration prompt appears

First go to Settings → General → VPN & Device Management and check whether an entry already exists: if it does, permission was already granted, so go back to the app and try again; if it doesn't, the system prompt was denied or skipped, so tap the switch again and allow it. If that still doesn't work, force-quit the app from the app switcher and open it again.

It says Connected, but web pages won't load

First switch Global Routing to Proxy so that all traffic goes through the server, and try again. If pages load under Proxy, the problem is in rule matching — some domain is being sent to DIRECT by your Config; if pages still won't load under Proxy, the problem is more likely in the server details, the subscription status, or your current network.

Connectivity Test keeps failing

Check item by item that Type, Host, Port, Password, and Method match exactly what your provider gave you; for entries that came from a subscription, refresh it once from the Subscribe entry. Then test on a different network, for example switching from Wi-Fi to cellular, to rule out the current network.

The list is still empty after importing a subscription

Go back to the Subscribe entry, paste the subscription link again, and make sure there are no extra spaces; some providers require you to generate a configuration in their dashboard before the link will work. If the provider's dashboard says the link has expired, ask the provider for a new one — don't use links from unknown sources, and don't share your link with others.

Only a few websites go through the proxy

That is the result of rule-based routing, not a fault. Open the Rule section in Config: rules are matched from top to bottom, so a match on PROXY goes through the proxy, a match on DIRECT connects directly, and a match on REJECT is blocked; to change where a domain goes, add a rule in the right place.

For cases the five items above don't cover, look under the Routing & troubleshooting category on the FAQ page; if the problem is about purchasing, restoring on a new device, or store regions, see the complete App Store guide.

Shadowrocket Settings screen: Language, Test Method, Today Widget, On Demand, Diagnostics, Proxy, TCP, UDP
Settings: Test Method, On Demand, Diagnostics, and other options live here.

Summary

Summary in three sentences

  • Server and subscription details come from your own provider; this site does not offer any servers, subscriptions, or lines.
  • A one-time app purchase is not a line plan: buying the app doesn't mean you have a working server.
  • Keep Global Routing on Config for everyday use, and let the rules decide whether a domain goes to PROXY or DIRECT.

Interface words

Interface terms at a glance

The interface terms from the five steps above are listed here in the order they appear. The descriptions are just explanations — the app always shows the English originals, so look for those.

Interface termWhere it is and what it does
HomeHome page. The connection switch, Global Routing, Connectivity Test, and the SERVER list all live here.
SERVERThe server group in the lower half of the Home page, listing the entries you have added.
Add ServerAdd a server by hand, filling in Type, Host, Port, Password, and Method.
SubscribeImport servers with a subscription link; after saving, the app fetches the configuration and builds the list automatically.
Scan QR CodeScan a QR code from your provider to import a server; the entry is at the bottom of the Add Server page.
Import from Cloud JSONImport server configuration from a JSON file; the entry is also at the bottom of the Add Server page.
ConfigThe configuration file editor, split into General, Rule, Hosts, URL Rewrite, and HTTPS Decryption.
Global RoutingGlobal routing mode: Config, Proxy, Direct.
Connectivity TestConnection test, used to confirm whether the client-to-server leg is reachable.
SettingsSettings page: Language, Test Method, Today Widget, On Demand, Diagnostics, Proxy, TCP, UDP.

Next

What to read next

This page covers only the order of operations for your first setup. Store and purchase questions, plus more detailed Q&A, are handled by the two pages below.

Complete App Store guide

Store regions and app availability, the three checks for a genuine copy (developer name Shadow Launch Technology Limited, the official icon, app ID 932747118), purchase and one-time buying, and restoring from Purchased on a new device — covered section by section.

Open the full guide

FAQ

Organized into four categories — genuine copies & purchase, install & first launch, subscriptions & server import, and routing & troubleshooting — so anything this page doesn't cover is worth checking there first.

Go to the Q&A